/ Architecture
~ 7 min
Published: 17/08/2026
What data should I give the studio to speed up the start of the project?
In the integrated Studia 54 project, architecture, landscape and interior develop in parallel, with each section going through its own stages. First, the architectural basis of the house is formed, then landscape architecture is connected, after clarifying the planning logic, interior design begins, and drawings, configuration and preparation for implementation become the final stage.
Even a small mistake at the start of a project can increase the time, budget and complexity of further construction.


A personal expert accompanies you all the way: helps you structure information, records your wishes, coordinates the work of architects, designers, and engineers, and explains what decisions will be made at each stage.
Technical specification
At the stage of the technical assignment, we collect basic data about your family, land, and future lifestyle. This is the basis for a comprehensive project: architects define the structure of the villa, designers understand the future logic of the interior, and the landscape team sees how the house will be connected to the territory, garden, views and recreation areas.
A technical specification is a document that will become your main tool in communicating with the designer and which he will rely on when creating a project. It includes all your functional and aesthetic preferences, budget, project deadlines, and planning requirements.
First, we clarify the composition of the family, daily habits, the format of the reception, the list of key rooms, privacy requirements and the work of the staff. This data helps to immediately establish the correct routes, the composition of the zones and the connection between the ceremonial, private and service spaces.
The data that is needed for the site: size, shape, cardinal directions, relief, views, entrances, neighboring houses, trees, reservoirs and communications. Based on them, the team determines the planting of the house, the location of terraces, a swimming pool, a summer kitchen, garden routes, landscaping and evening lighting.
At the same stage, you provide the first references on architecture, interior design, and landscape: materials, palette, furniture, light, atmosphere, examples of gardens, terraces, pools, and outdoor furniture.
To make working with references more convenient for you, we have collected all the Studia 54 projects on Pinterest. There you can quickly find examples in various areas: from bathrooms, bedrooms and living rooms to facades, terraces, pools and landscaping solutions.


Architecture
Stage 1. Preliminary sketch
The first stage of the architectural project is related to the general logic of the future villa. At this stage, it is important for the Studia 54 team to understand the scale of the house, the composition of your family, lifestyle, recreation scenarios, reception format, privacy level and site features.
To get a well-thought-out plan, you should tell us how many people will live in the house permanently, how the family spends the morning and evening, how often guests come, whether an office is needed, which areas should become the center of family life and which spaces require maximum silence. The work of the staff is discussed separately: a housekeeper, a nanny, a driver, a cook, a gardener, the format of their presence in the house, service areas and routes of movement.
At the same stage, you transmit data about the site: size, shape, cardinal directions, views, terrain, entrances, location of neighboring houses, existing trees, reservoirs, and utilities. This information helps architects understand how to plant a house on a plot, where to reveal the view, where to create more enclosed facades, how to place terraces and how to connect architecture with the landscape.
As a result, the first planning diagram shows how life in the house will be arranged: where the front areas, private blocks, service rooms, entrances, stairs, terraces and main routes will be located.
We show the desired image of the house in a preliminary detailed sketch with references.
Stage 2. Floor plan
After the approval of the general scheme, the team proceeds to the floor plan. At this stage, the architectural idea becomes more precise: the dimensions of the rooms, the connections between the floors, the position of stairs, elevators, technical areas, a master block, children's rooms, guest bedrooms, a kitchen, a dining room, an office, a spa area and other spaces appear.
To make the layout convenient for your family, it is important to give detailed feedback on each option. Which routes seem comfortable, which areas you want to make bigger, where more privacy is needed, which rooms should be connected directly, and which ones should be separated into different parts of the house.
At this stage, the details of daily life are especially important. Where it is more convenient to store outerwear, how the family gets from the garage to the house, where the morning kitchen will be located, what should be the way from the master bedroom to the dressing room and bathroom, how the guests will pass into the living room and how the staff will serve the house during the reception.
Studia 54 usually offers several options for planning logic with furniture placement, so that you can see different scenarios of life in the house and understand how each space will feel. Already at this stage, a designer gets involved in the work: he helps lay the foundation for the future interior, check the proportions of the rooms, the location of the furniture, the routes of movement and the connection between the zones.
Stage 3. Visualization and personalization
When the floor plan is agreed upon, the team proceeds to visualize the architectural image. At this stage, you will need more precise wishes for the nature of the house: the degree of openness of the facades, a sense of scale, attitude to stone, wood, glass, metal, color, textures and the general plasticity of architecture.
References are especially important here. Show the houses, facades, terraces, entrances, roof details, materials and elements that are close to your mood. The team analyzes what exactly attracted in these images: proportions, light, monumentality, lightness, panoramic glazing, connection with nature or expressiveness of materials.
If your family has art objects, sculptures, or important interior objects, they should be identified at this stage. Architecture can take into account in advance the location for a large sculpture in the hall, a painting in a two-light living room, or a collection that requires a separate space.
Photorealistic visualization helps to see the future villa as an integral architectural image, where the layout, facades, materials, light and the plot add up to a single logic.


Stage 4. Drawings
After approving the architectural concept, the team proceeds to the drawings. At this stage, the image of the house is translated into a technical language for further implementation.
The architectural solution includes plans, facades, sections, statements, marking plans, floor plans, nodes, specifications and other materials that allow builders to accurately implement the project. The structural solution includes foundations, floors, vertical structures, stairs, pool bowl, roof and other significant engineering elements.
With the drawings, you get key solutions: layout, room composition, materials, engineering requirements, placement of the pool, spa area, fireplaces, stairs, stained glass windows, panoramic glazing and complex architectural elements.


Landscape
Stage 1. Planning scheme
Landscape architecture begins with understanding how you will use the site. At this stage, the team collects data on the entrance to the territory, guest routes, private garden areas, terraces, swimming pool, playgrounds, recreation areas, summer kitchen, walking routes and site views.
Identify in advance which parts of the site should be formal, which rooms, where the family plans to spend more time, where shade, privacy, an open view, a reception area or a quiet place to relax are needed.
If the site has mature trees, terrain, body of water, views of the forest, mountains, sea or city, this data helps the landscape architect to include the features of the territory in the project.
Stage 2. Visualization and personalization
After approving the planning scheme, the team proceeds to visualize the landscape. Here it is important to convey the wishes for the atmosphere of the garden: a more natural or more architectural character, dense greenery or open spaces, Mediterranean plants, strict geometry, water elements, lighting, stone, wood, paving and outdoor furniture.
At this stage, the seasonality of the site's use, the level of plant care, evening lighting scenarios, the location of decorative accents and the relationship of the landscape with the facades of the house are being clarified.


Stage 3. Drawings
When the landscape image is approved, the team prepares the drawings for implementation. They record planning solutions, coverings, plantings, lighting, retaining walls, water elements, small architectural forms and technical solutions for the maintenance of the territory.
As a result, you get a ready-made landscape solution: with selected materials, plants, routes, recreation areas, lighting system and solutions for the further operation of the site.
Interior design
Stage 1. Planning solution
Interior design is connected after the architectural layout has received a clear basis. At this stage, the designers clarify the inner life of each room: furniture placement, usage scenarios, storage, family habits, personal rituals and privacy requirements.
To get a thoughtful interior layout, tell us how each area will be used. Where the family has breakfast, where they gather in the evening, how often they receive guests, where children play and learn, how the master unit is used, whether a separate coffee point is needed, how work from home is arranged, which pieces of furniture you want to preserve and which collections need to be integrated into the interior.
At this stage, the layout of the house is filled with real life. The team understands where a large table is needed, where a chamber soft group is required, where it is important to provide built-in storage, where special light is required, and where art will be a key focus.
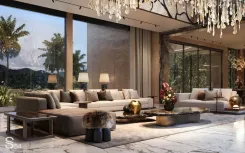

Stage 2. Visualization and personalization
After agreeing on the interior layout, the team proceeds to visualizations. Here you provide references, suggestions on materials, colors, furniture, light, art, textiles and the general atmosphere of the house.
You should add a short comment to each image.: what exactly do you like about this reference? The palette, the texture of the stone, the warmth of the wood, the softness of the light, the shape of the sofa, the mood of the bedroom, the scale of the kitchen, the expressiveness of the bathroom or the feeling of tranquility.
We wrote about trends in the world of design in this article.
It is also important to identify solutions that cause discomfort: active marble, cool shades, gloss, dark wood, a large number of mirrors or bright color accents. This data helps designers to quickly find a visual language that is comfortable for you and your family.
At this stage, the interior becomes visible: materials, furniture, light, decorative accents and art objects form a complete image of the future house.
Stage 3. Drawings
After the visualizations are approved, the team prepares interior drawings: finishing plans, wall layouts, nodes, lighting and electrical circuits, plumbing fixtures, built-in furniture, individual products and material specifications.
In these documents, the visual concept gets a precise reference for implementation: from furniture, lights and sockets to kitchen equipment, decorative panels, stone, wood, textiles and art objects.


Project configuration and implementation
After approving the architecture, landscape, and interior, the team proceeds to complete and prepare the implementation. At this stage, real positions are selected: furniture, lighting, plumbing, finishing materials, appliances, decor and equipment.
You will need suggestions on brands, budget levels, delivery dates, materials, operational requirements, and items that the family wants to use from existing ones.
By the time construction starts, deadlines, budget, materials, specifications, and a unified project logic must be agreed upon. A personal expert helps to keep in touch between you, the project team and construction specialists so that the approved concept maintains quality at all stages of implementation.


Why is this necessary?
The technical specifications for the villa are arranged in stages, because different data is needed at each stage of the project. First, you talk about your family, your plot, and your lifestyle. Then you specify the logic of the layout, scenarios of life on the territory, interior habits, materials, art and personal items. At the stage of drawings and configuration, you confirm the solutions that are being implemented.
This is how the Studia 54 team moves sequentially: from your lifestyle to architectural logic, from architecture to landscape and interior, from visual image to drawings, configuration and construction.
The more accurately you transmit the data at each stage, the faster the concept is born, the more relaxed the approvals are, and the closer the future villa becomes to the life for which it is being created.


Homeowner checklist: what to prepare before designing your villa
Before the project begins, gather the materials that will help the architects understand your lifestyle, the site, and your expectations for the future home.
1. Your dream home
☐ Who will live in the house permanently
☐ Who will visit and how often
☐ Which scenarios matter most to your family: breakfasts, receptions, working from home, sports, relaxation, evening gatherings
☐ Which areas should feel the most private
☐ Which rooms should become the center of family life
2. General information
☐ A site plan with dimensions and boundaries
☐ Information on orientation and cardinal directions
☐ Photos of the views from the site
☐ Information about neighbors, access roads, and existing trees
☐ Details on the terrain and utilities
3. List of essential rooms
☐ Number of bedrooms
☐ Format of the living room and dining area
☐ Composition of the master suite
☐ Children’s areas
☐ Study or home office
☐ Spa, gym, cinema room, wine room, playroom, or other special-purpose spaces
☐ Walk-in wardrobes, storage rooms, laundry room, technical and service areas
4. Staff in your home
☐ Who will work in the house
☐ Whether staff will live on the property
☐ Which rooms are needed for staff
☐ How service routes should be organized
☐ Where household, technical, and utility items will be stored
5. References for the ideal home, garden, and interior
☐ Architecture you like
☐ Interiors that feel close to your desired atmosphere
☐ Materials, textures, and color combinations
☐ Examples of terraces, pools, spa areas, living rooms, and master suites
☐ Comments for each reference explaining what exactly attracted you to the image
6. Restrictions and anti-references
☐ Colors, materials, and design techniques that feel uncomfortable
☐ Solutions that should definitely be excluded
☐ Special requirements for privacy, security, acoustics, or climate
☐ Technical limitations of the site or future construction
7. Artworks and personal collections
☐ Paintings, sculptures, and art objects
☐ Furniture you would like to keep
☐ Collections, books, tableware, textiles, or decor
☐ Photos, dimensions, and placement wishes for these items
The more precise your initial information is, the faster the architects can move from general expectations to a clear concept for your future home.